Use FigBloxUI with AI agents
Ask an AI app to send a Figma frame to Roblox Studio for you. FigBloxUI works with AI apps that can add a connector (also called an MCP server), such as Claude, ChatGPT, Cursor, VS Code with GitHub Copilot, Codex and Gemini.
The AI can look at your frames and start a Send. The conversion still runs inside your FigBloxUI plugin, so Studio gets exactly what Send to Roblox would give you. Anyone who can Send can use it, a free trial included.
Before you start
- In Figma, open FigBloxUI, switch to Live and log in with Roblox. New to Live? See Live Mode.
- In FigBloxUI, open Settings > AI agents. Clicking Connect or Get code there turns on Allow AI agents for you. If you connect from your AI app’s page first, turn on Allow AI agents yourself. It stays off until one of those happens. Do not see Settings > AI agents? Close and reopen FigBloxUI so Figma loads the latest version.
- In Roblox Studio, open the FigBloxUI panel and keep it open, as for any Live Send. Live needs Studio plugin 3.0.0 or later.
Keep the Figma window open, and in front when you can, because Figma slows plugins down in windows you cannot see.
Connect FigBloxUI to your AI app
Connecting is two short parts. First, add FigBloxUI to your AI app, and the app opens a FigBloxUI page in your browser. Then finish connecting: one click on that page if this browser already knows you, or Connect in FigBloxUI and then Connect in the tab it opens. There is no code to type.
Every AI app uses the same connector address:
https://api.figbloxui.dev/mcpUse it exactly as written, with no slash at the end. FigBloxUI also shows it under Settings > AI agents, with a Copy button.
Let your coding agent set it up
Using Claude Code, Codex or Cursor? Paste this prompt into your agent and it sets FigBloxUI up for itself. You still sign in yourself, in your browser.
Set up the FigBloxUI connector (an MCP server) for yourself.
Address: https://api.figbloxui.dev/mcp
Use the steps for your own app.
Claude Code: runclaude mcp add --transport http --scope user figbloxui https://api.figbloxui.dev/mcpthen tell me to run /mcp and sign in.
Codex: add this to ~/.codex/config.toml and keep the rest of the file:[mcp_servers.figbloxui]url = "https://api.figbloxui.dev/mcp"then tell me to sign in with codex mcp login figbloxui (or Authenticate in Settings > MCP servers).
Cursor: add this under "mcpServers" in ~/.cursor/mcp.json and keep my other servers:"figbloxui": { "url": "https://api.figbloxui.dev/mcp" }then tell me to follow the page that opens.
I sign in myself, on the FigBloxUI page that opens in my browser. Never ask me for a password or a connect code in this chat.
Then remind me to open FigBloxUI in Figma, switch to Live and log in with Roblox, and to keep Roblox Studio's FigBloxUI panel open.
When the FigBloxUI tools appear, call get_status and tell me what it says.
Claude app
- Open Customize > Connectors, choose Add custom connector, name it FigBloxUI, paste the address and click Continue. Keep the sign-in options Claude finds, click Add, then Connect. Your browser opens a Claude page that asks you to finish connecting, then the FigBloxUI page: click Connect on both.
- In a chat, turn FigBloxUI on from the + menu under Connectors.

Free plans can add one custom connector. On Team and Enterprise, an Owner adds it first under Organization settings > Connectors. More in Claude’s guide.
Claude Code
claude mcp add --transport http figbloxui https://api.figbloxui.dev/mcpThen run /mcp inside Claude Code and follow the steps in your browser to sign in. You can also sign in from the terminal with claude mcp login figbloxui. Add --scope user to use FigBloxUI in every project. More in Claude Code’s guide.
ChatGPT
- On chatgpt.com, open Plugins, click +, choose Add custom MCP server, name it FigBloxUI, paste the address under Connection, set authentication to OAuth, accept the warning and click Create as a plugin.
- Install the plugin, then type @ in a chat and pick it.
A Send is a write action, and OpenAI currently allows write actions from custom servers only on Business, Enterprise and Edu workspaces, where an admin or owner sets the server up. Pro accounts can connect read-only, so the AI can list frames but cannot send them. Custom servers cannot be added in the mobile app. More in OpenAI’s help article.
Cursor
Add to Cursor adds FigBloxUI in one click. FigBloxUI has the same button under Settings > AI agents. If nothing opens, use the steps below.
Open Customize and add an MCP server, or add FigBloxUI to ~/.cursor/mcp.json:
{ "mcpServers": { "figbloxui": { "url": "https://api.figbloxui.dev/mcp" } }}Then click Authenticate next to figbloxui in Cursor’s MCP list and follow the page that opens. More in Cursor’s guide.
VS Code with GitHub Copilot
Add to VS Code adds FigBloxUI in one click. FigBloxUI has the same button under Settings > AI agents. If nothing opens, use the steps below.
Run MCP: Add Server from the Command Palette, choose HTTP, paste the address and give it a name. Confirm that you trust the server and sign in when VS Code asks, then find the tools in Copilot Chat under Configure Tools. If your organization manages Copilot, an admin may need to allow MCP servers. More in VS Code’s guide.
Codex
In the Codex app, open Settings > MCP servers > Add server, choose Streamable HTTP, paste the address, save, restart and click Authenticate. The app, the IDE extension and the CLI share this setup. In the CLI you can add this to ~/.codex/config.toml instead, then run codex mcp login figbloxui:
[mcp_servers.figbloxui]url = "https://api.figbloxui.dev/mcp"More in Codex’s guide.
Gemini
- Gemini app: on gemini.google.com, open Settings > Connected Apps, choose Add a custom app, paste the address and click Next. Google offers this to personal accounts of people 18 or older in the US, in English, with Keep Activity on. See Google’s help page.
- Gemini CLI: run
gemini mcp add --scope user --transport http figbloxui https://api.figbloxui.dev/mcp, then type/mcp auth figbloxuiin Gemini CLI. See Gemini CLI’s guide. - Antigravity: under
mcpServersin~/.gemini/config/mcp_config.json, addfigbloxuiwith"serverUrl": "https://api.figbloxui.dev/mcp", then open Settings > Customizations and click Authenticate next to figbloxui. After you click Connect on the FigBloxUI page, Antigravity’s page shows a code: copy it, paste it into Paste auth code in Antigravity and click Submit. See Antigravity’s guide. - Gemini Enterprise: not supported yet, because it needs a client ID and secret that FigBloxUI does not issue.
Other AI apps (mcp-remote)
Some AI apps can only run local servers. For those, use the mcp-remote bridge, which needs Node.js 18 or newer. In the app’s MCP settings, add this server:
{ "mcpServers": { "figbloxui": { "command": "npx", "args": ["mcp-remote", "https://api.figbloxui.dev/mcp"] } }}A browser window opens for the sign-in the first time. More in the mcp-remote guide.
Finish connecting
The first time an AI app connects, it opens a FigBloxUI page in your browser. The page shows one language at a time. It opens in English or Thai, whichever your browser prefers, and the link at the bottom (ภาษาไทย on the English page, English on the Thai page) switches to the other without reloading. What you do next depends on whether this browser already knows you.
If you logged in to FigBloxUI with Roblox, or connected an app without a code, in this browser in the last 90 days, the page is headed “Connect an AI app” and says “An app named Claude wants to list your Figma frames and send them to Roblox Studio as Ana.”, with your own Roblox display name instead of Ana. Under the text are Connect and Cancel. Click Connect and you are done. The buttons give way to the line “Connecting”, then the page says “Claude is connected” with “Going back to Claude.” under it, and takes you back to your AI app. You do not need to open Figma to connect. If the name is not yours, click Use another account, in the line “Not Ana? Use another account” under the buttons, to start over.
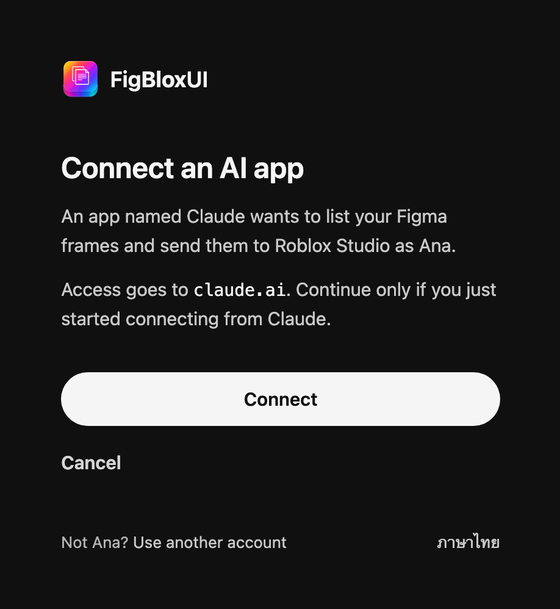
Before you click, the page can add a line above the buttons about whether FigBloxUI is ready:
- “FigBloxUI is not open in Figma. You can connect now and open it later.” Connect now, and open FigBloxUI before you ask the AI to send.
- “Turn on Allow AI agents in FigBloxUI > Settings > AI agents to use it.” You can connect, but the AI cannot use FigBloxUI until you turn that switch on.
When FigBloxUI is open in Figma and ready, the page adds no line. It adds none when FigBloxUI cannot check either, and in every case you can click Connect.
Otherwise, the page is headed “Connect an AI app” and says “In Figma, open FigBloxUI > Settings > AI agents and click Connect.” It shows no waiting message and carries on by itself. Connecting takes two clicks: one in FigBloxUI, and one in a new tab that shows you what you are about to connect.
- In Figma, open FigBloxUI, go to Settings > AI agents and click Connect under Connect an AI app. FigBloxUI says “Opened your browser. Click Connect there to finish.” and a new tab opens.
- The new tab is headed “Connect an AI app” and says “An app named Claude wants to list your Figma frames and send them to Roblox Studio as Ana.”, with your own Roblox display name instead of Ana. It names the app, says where access goes, and reminds you: “Continue only if you just started connecting from Claude.” Click Connect, or Cancel if the name is wrong or you did not start this.
- The new tab says “Claude is connected” and “You can close this tab.” Within a couple of seconds, the page your AI app opened says “Claude is connected” and “Going back to Claude.” and takes you back to the app by itself.
The new tab always asks, even while the page your AI app opened is still waiting, because another web page could have opened a connect page in your browser. Opening the link from FigBloxUI never connects anything by itself. Only your click on Connect in the new tab does.
Each of these pages says where access goes, as “Access goes to” followed by an address. The new tab, and the page for a browser that knows you, also say which app is asking. If the app runs on your computer, such as Claude Code or mcp-remote, the address is followed by “an app on this computer”, and the line ends with “Continue only if you just started connecting from it.” In the new tab that wording takes the place of the reminder above. Click Connect only if you just started the connection yourself. The FigBloxUI activity log then shows AI agents: Claude connected.
Reconnecting. An app you already connected reconnects by itself, with no click, only when all three of these are true:
- You have clicked Connect in this browser on a page that shows your Roblox name, either the page your AI app opened or the new tab. A click after typing a code does not count, and neither does the Connect button inside FigBloxUI, which only opens the new tab.
- The app asks again as the same app, with the same return address (where access is sent) and the same access as when you connected it. An app that registers itself again counts as a new app.
- It is still listed under Connected apps.
If one of these is not true, it connects like a new app. A new app always needs your click.
If no browser opens
If clicking Connect in Figma opens nothing, use a connect code instead. A code shows that you are the person using the plugin.
- On the page your AI app opened, click Use a code instead.
- In Figma, go to Settings > AI agents, click Use a code instead under Connect an AI app, then click Get code.
- Read the code it shows, for example
ABCD-2345, or click Copy. A code works once and lasts 10 minutes, and a countdown shows the time left. - Type the code in the Connect code field and click Continue. Capital letters, spaces and the dash do not matter.
- Check the Roblox display name in the sentence on the next screen and click Connect. Click Cancel if it is the wrong account.
If the code stops working, click Get code or New code for a fresh one. A new code replaces the old one. If your AI app opened no page at all, see No sign-in page opens in Troubleshooting.
If the page is in another browser
If the new tab says This browser now remembers you as and your name, it did not find your AI app’s page in that browser. There are two common reasons:
- Your AI app has not opened its page yet. Start the connection in the app, and its page shows Connect at once.
- The page is in another browser, profile or private window. The new tab then shows a code under the line “If that page is open in another browser, type this code there:”. On your AI app’s page, click Use a code instead, type the code and click Continue, then click Connect on the next screen, as in the steps above. The code works once and lasts 10 minutes.
Try it
A good first message is “Is FigBloxUI ready to send?” The AI checks Figma and Studio and tells you what is missing. Then ask in your own words:
- “Send what I selected in Figma to Roblox Studio.”
- “List the frames on my current Figma page.”
- “Send the frame Daily Quests to Roblox Studio in Scaled mode.”
- “Send my selected frame to Studio and replace the old one.”
- “Send Shop to Studio in Offset mode and keep both versions.”
- “Send Inventory to Studio with Preserve layers.”
To send what you selected, pick the frame in Figma first. The AI sends exactly what Send to Roblox would send right now: the frame shown in FigBloxUI’s preview, or only the layers you selected in it (how selecting works).
To send another frame, name it. The AI finds frames by name on your current page, so use the names from Figma. If you name no mode, the Offset / Scaled switch in the plugin decides (which to choose). If the frame is already in Studio, FigBloxUI asks Replace or Keep Both as usual (what happens). Say “replace” or “keep both” in your message and the AI answers that question for you. With YOLO mode on, an existing import is replaced unless you say “keep both”.
A named Artwork layers choice (Automatic, Separate or Preserve layers) applies to that Send only, and if you name none, the Artwork layers setting in Settings decides (what each one does). Separate and Preserve layers send more images and can take several minutes on a large design.
Some AI apps also list a ready-made prompt named send_frame. Pick it, then type a frame name or leave the name empty to send what you selected. You can add a mode and Artwork layers if you like.
Each Send uploads images to Roblox, so ask for one Send at a time. The AI is told to check with you before it sends the same frame again.
Ask the AI about FigBloxUI
The AI can read FigBloxUI’s own guides, the same text as these docs, such as Naming Convention, Supported Features, Troubleshooting and Image Moderation. Ask things like:
- “How should I name my layers so FigBloxUI makes buttons?”
- “Should this screen use Offset or Scaled?”
- “Why does my gradient look different in Studio?”
Reading a guide needs neither Figma nor Studio, so it works even when FigBloxUI is closed, and it adds no line to the activity log.
Some AI apps also list three task prompts next to send_frame:
prepare_framechecks a frame against the guides and lists what to rename or regroup before you send it. It sends nothing until you say yes.why_differentexplains why something in Studio looks different from Figma, and how to fix it.send_screenssends several frames one at a time, after you confirm the list.
In Claude Code the prompts are slash commands, such as /mcp__figbloxui__why_different. Put what you type after the command in quotes, as in /mcp__figbloxui__why_different "the text looks bigger in Studio". Without quotes only the first word is passed on.
YOLO mode
YOLO mode makes your AI app’s Sends run without asking you. It is for hands-free runs where you trust the apps you connected.
Turn it on in Settings > AI agents with YOLO: AI Sends never ask. The switch shows only while Allow AI agents is on, and it is off until you turn it on. While it is on, a YOLO badge shows at the top of FigBloxUI. It stays on until you turn it off with the same switch, even after you close and reopen FigBloxUI.
With YOLO on, for Sends that an AI app starts:
- There is no Allow this Send? prompt, for any app.
- An import that already exists in Studio is replaced, unless the app asked to keep both.
- If the layout mode in Studio differs from the Send’s (Offset or Scaled), Studio is switched to the Send’s mode.
- A question FigBloxUI cannot answer for you ends the Send at once, and your AI app reports the error. If Studio is not connected, it reports “Open the FigBloxUI panel in Roblox Studio first.” (
STUDIO_NOT_CONNECTED). For any other question it reports “Answer the prompt in Figma: ” followed by the question (NEEDS_USER).
A Send you start yourself in FigBloxUI works as always and still asks.
Be careful: any connected AI app can send to Studio and replace UI there without asking. Turn YOLO on only when you trust every app listed under Connected apps, and keep a copy of anything you cannot lose.
What you will see
In your AI app. The AI uses five FigBloxUI tools, and your app may show their names or ask before it runs them:
get_statuschecks that Figma and Studio are ready, and says which Offset / Scaled and Artwork layers settings Figma has.list_frameslists the frames on your current page and your selection.send_to_studiostarts a Send. It is the only tool that changes anything, and only in Studio.get_send_statusfollows a Send until it is done. When it is done, the AI is told how many objects and images Studio got, whether the Send made a new import, replaced the old one or kept both, how many images were uploaded and how many were already uploaded, how long it took, and the warnings from FigBloxUI’s log.get_guidereads one of FigBloxUI’s guides. It needs neither Figma nor Studio.
What the AI cannot do:
- Change your Figma file. It cannot rename, move or delete layers.
- Change FigBloxUI’s settings, such as Image owner or the switches under Settings > AI agents.
- Export Code or ZIP. It sends in Live only.
- Edit what is already in Studio. It can only send, which adds an import or replaces one.
When a Send finishes, the AI tells you how many objects and images it sent.
In the FigBloxUI activity log. A line appears when an app connects or disconnects, each time the AI lists your frames, and for each Send request that reaches FigBloxUI in Figma, so you can see what happened:
AI agents: Claude connectedAI (Claude): list_framesAI (Claude): send Daily Quests (Scaled, Automatic)AI (Claude): Send approvedChecking readiness with get_status adds no line. Following a Send with get_send_status adds none either, unless FigBloxUI has no record of that Send and has to ask Figma about it, which writes AI (Claude): status.
Other lines you may see: AI (Claude): Send approved (always allowed), AI (Claude): Send denied, AI (Claude): no answer in 60 s, Send cancelled, AI (Claude): lost contact, Send cancelled, AI (Claude): the selection changed, Send cancelled, AI (Claude): Figma did not answer, Send cancelled, AI (Claude): could not open Daily Quests, AI (Claude): send refused, FigBloxUI is busy, AI (Claude): replacing the existing import, AI (Claude): keeping both, AI (Claude): YOLO, Send approved without asking, AI (Claude): YOLO, replacing the existing import, AI (Claude): YOLO, keeping both, AI (Claude): YOLO, switching the layout mode to the Send's, AI (Claude): status and AI agents: Claude disconnected. The busy line can also name the frame and its settings, as in AI (Claude): send Shop refused, FigBloxUI is busy and AI (Claude): send Quests (Offset, Separate) refused, FigBloxUI is busy.
The Allow / Deny prompt. With Ask before each Send on, which is the default, and YOLO mode off, FigBloxUI asks Allow this Send? before it sends anything the AI requested:
Claude wants to send “Daily Quests” to Roblox Studio (Scaled, Automatic).
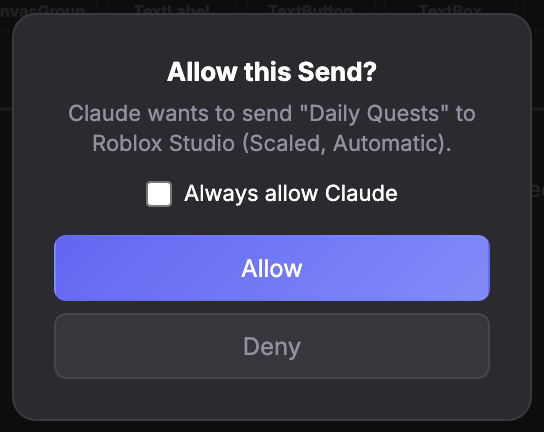
The brackets name both choices for this Send, Offset or Scaled first and then Artwork layers. If you told the AI to replace the old one or keep both, they end with that too, as in (Scaled, Automatic, replaces the existing import) or (Scaled, Automatic, keeps both). If you selected only some layers, the prompt says how many, as in Claude wants to send 3 selected layers from "Daily Quests" to Roblox Studio (Scaled, Automatic). Click Allow to run the Send or Deny to stop it. If nobody answers within 60 seconds, the Send is cancelled.
Under the text is a checkbox, Always allow Claude, unticked to start with. Tick it before you click Allow and later Sends from that app skip the prompt, with AI (Claude): Send approved (always allowed) in the activity log. It skips only this prompt, so Allow AI agents and every readiness check work as before. To be asked again, click Ask again in Manage.
During the Send. It runs exactly as if you pressed Send to Roblox, with your current settings. If you asked for Offset or Scaled, or for an Artwork layers choice, that choice applies to this Send only. FigBloxUI may select the frame, and switch to its page, while it works, then puts your selection and page back unless you moved them yourself. If FigBloxUI needs a decision, such as Replace or Keep Both, it asks in Figma as usual and the AI tells you it is waiting for you. With YOLO mode on it never waits for you: it answers the import questions itself or ends the Send with an error. Keep FigBloxUI open until the Send finishes.
Manage
Open Settings > AI agents in FigBloxUI:
- Allow AI agents: the main switch. It starts off, and clicking Connect or Get code turns it on. Turn it off to pause every connected AI app at once, and on again when you are ready.
- Ask before each Send: on by default, so nothing is sent without your Allow. Turn it off only for hands-free runs. To skip the prompt for one app only, tick Always allow on its prompt instead.
- YOLO: AI Sends never ask: shown while Allow AI agents is on, and off by default. When it is on, a YOLO badge shows in FigBloxUI and AI Sends skip every prompt. Read YOLO mode first.
- Connector address: the address from this page, with a Copy button. Under it, Add to Cursor and Add to VS Code open the app and add FigBloxUI for you, so you can skip the manual steps above.
- Connected apps: every AI app you connected is listed here. An app you set to always allow shows Always allowed and an Ask again button, which brings the prompt back for that app. Click Disconnect to remove an app. It takes effect at once, it clears the app’s Always allow, and the app has to connect again before it can use FigBloxUI.
- “Browsers remember you for 90 days.” This line sits under the list, and it is what lets the next app connect with one click. Click Forget browsers and every browser asks again the next time an app connects, and FigBloxUI says Done. Browsers will ask again. Apps you already connected stay connected.
You can also remove FigBloxUI from the AI app’s own connector list.
Privacy
- What the AI sees: the names of your open Figma file and page, your frame names and sizes, your current selection, the status of a Send and the activity log lines for it. Your AI app and its provider see the same things, under their own privacy terms.
- What it never gets: your design file, your images or the FigBloxUI converter. The conversion runs inside your plugin.
- What it can change: nothing in your Figma file. It can only check status, list frames and start a Send into Studio.
- Images: a Send uploads images to the Image owner you chose, your Roblox account or a Group, exactly like a Send you start yourself.
- Who can connect: only someone using your logged-in plugin, or a browser it remembers for 90 days (Forget browsers ends that). Connecting through the plugin takes a click on Connect in FigBloxUI and a second click on Connect in the tab it opens, or a code from the plugin. The link and the code each work once and expire after 10 minutes, and the page names the app and where access goes before you confirm.
- Remembered browsers: a browser where you log in to FigBloxUI with Roblox, or connect an app without a code, is remembered with a cookie for 90 days. The next app connects there with one click. Once you have connected an app there without a code, an app you connected earlier can reconnect by itself, on the terms in Finish connecting. A new app always needs a click, Allow AI agents stays off until you turn it on or click Connect or Get code in FigBloxUI, and each Send asks unless you tick Always allow or turn on YOLO mode. Forget browsers ends the remembering for every browser at once, so use it after you work on a shared computer.
- Names from other people: frame names come from your file, and the AI reads them. Be careful with files from people you do not know, keep Ask before each Send on, leave YOLO off, and leave Always allow for files you trust.
Troubleshooting
Your AI app shows you the message from FigBloxUI. Find it below, with its code in case your app shows that instead.
Connecting
- The page keeps saying “In Figma, open FigBloxUI > Settings > AI agents and click Connect.” In Figma, open Settings > AI agents and click Connect, then click Connect in the tab that opens. If the new tab shows a code instead of asking you to connect, your AI app’s page is in another browser. See If the page is in another browser.
- The new tab says “Claude is connected” and “You can close this tab.” but your AI app keeps waiting. Some browsers, Safari among them, pause the page your AI app opened while it sits in a background tab, so it does not notice that you connected. Switch to that tab, or close the new tab to land on it. If you do that within about 2 minutes of clicking Connect, the page carries on by itself. After that it says “This page expired” and “Start again from your AI app.”, and you start the connection again from your AI app.
- The page says “This link has expired” and “In FigBloxUI, click Connect again.” A Connect link works once and lasts 10 minutes, so reloading the tab shows this too. Click Connect under Connect an AI app again.
- The page says “This page expired” and “Start again from your AI app.” The page waits 10 minutes for you to click Connect. If it sat paused in a background tab, it has only about 2 minutes after your click to take you back to the app. Start the connection again from your AI app, then click Connect.
- The page says “That code is not valid or has expired.” A code works once and expires after 10 minutes, and a new code replaces the old one. Under Connect an AI app, click Get code or New code for a fresh code (click Use a code instead first if you do not see them) and type it in. Capital letters, spaces and the dash do not matter. After a few wrong tries the page stops accepting codes, so start the connection again from your AI app.
- The plugin says “Log in with Roblox first.” or “Log in with Roblox again to use AI agents.” Click Login with Roblox in the plugin (the button reads Login with Roblox for Live & Code Mode in the Full plugin size), then click Connect or Get code again. The second message can also end “to connect.” or “to get a code.”
- The plugin says “Too many tries. Try again later.” or “Too many codes. Try again later.” Connect and Get code each allow up to 10 tries an hour. Wait a while, then try again.
- The plugin says “Could not connect. Try again.”, “The code expired. Get a new one.” or “Could not get a code. Try again.” Click Connect again, or Get code if you are using a code.
- No sign-in page opens. Look for a Connect, Authenticate or Sign in button next to FigBloxUI in the app’s connector list, and check that your browser is not blocking the page.
- The name on the page is not yours. Click Use another account if the page offers it, or Cancel. The Figma window is logged in with another Roblox account, or this browser remembers someone else. Log in with the right account in FigBloxUI and connect again. If you already clicked Connect and the name was wrong, click Disconnect next to the app under Connected apps in that FigBloxUI window first.
- The AI app asks you to connect again. You disconnected it, or it went 30 days without being used. Connect again.
- mcp-remote keeps failing. Check that Node.js is version 18 or newer, delete the
~/.mcp-authfolder, restart the app and connect again.
FigBloxUI is not ready
-
“Open FigBloxUI in Figma and switch it to Live mode.” (
FIGMA_NOT_OPEN) FigBloxUI is closed, it is in Code or ZIP mode instead of Live, you logged out, or it is logged in with a different Roblox account than the one you connected. Leaving Live mode or logging out closes FigBloxUI’s live connection, so the AI’s next request usually gets this message right away. Open FigBloxUI, switch to Live, log in with the same account and keep the window open. -
“Update FigBloxUI in Figma to use AI agents, then reopen it.” (
PLUGIN_UPDATE_REQUIRED) Close FigBloxUI and open it again so Figma loads the latest version. -
“Switch FigBloxUI in Figma to Live mode.” (
NOT_LIVE_MODE) You will rarely see this one, because leaving Live mode closes FigBloxUI’s live connection and the AI usually getsFIGMA_NOT_OPENinstead. If you do, choose Live beside Code and ZIP. -
“In Figma, open FigBloxUI > Settings > AI agents and turn on Allow AI agents.” (
AGENTS_NOT_ALLOWED) Turn on the switch, or click Connect or Get code there, which turns it on. It is off by default. -
“Log in to FigBloxUI in Figma.” (
NOT_LOGGED_IN) Logging out closes FigBloxUI’s live connection and the AI usually getsFIGMA_NOT_OPENinstead, so you should rarely see this one. If you do, click Login with Roblox in the plugin. -
“FigBloxUI could not verify your login. Log in to FigBloxUI in Figma again, then reopen it.” (
LOGIN_NOT_VERIFIED) FigBloxUI is open, but its Roblox login could not be checked, so the AI cannot use it yet. In FigBloxUI click Logout, then Login with Roblox, then close FigBloxUI and open it again. -
“Your FigBloxUI plan or trial has ended. Open FigBloxUI in Figma to continue.” (
LICENSE_REQUIRED) See Trial expired. -
“Open the FigBloxUI panel in Roblox Studio first.” (
STUDIO_NOT_CONNECTED) Open the panel and keep it open, in Studio logged in with the same Roblox account. With YOLO mode on, a Send that reaches the “Check Roblox Studio” question ends with this message at once. More in Studio can’t connect. -
“FigBloxUI in Figma did not answer. Bring the Figma window to the front and try again.” (
FIGMA_NOT_RESPONDING) Figma slows plugins down in windows you cannot see. Bring it to the front and ask again. If it keeps happening, close and reopen FigBloxUI. -
“Answer the prompt in Figma:” and the question’s name (
NEEDS_USER) With YOLO mode on, FigBloxUI hit a question it cannot answer for you, such as “Update the Studio plugin”, and ended the Send. The message names the question. Fix what it asks for, such as updating the Studio plugin, then ask again. Without YOLO, the AI instead says it is waiting for you and the question shows in Figma.
Choosing the file or frame
- “FigBloxUI is open in more than one Figma file. Pass fileId from get_status.” (
MULTIPLE_FILES_OPEN) The message can go on to list the open files. Tell the AI which file to use by its name, or close FigBloxUI in the files you are not using. - “That Figma file is no longer open in FigBloxUI. Call get_status again.” (
FILE_NOT_FOUND) The window was closed or reloaded. Ask the AI to check again. - “Nothing is selected in FigBloxUI. Pick a frame in Figma, or pass frameName or nodeId.” (
NOTHING_SELECTED) The AI was asked to send what you selected, and FigBloxUI has no frame to send. Click a frame in Figma so FigBloxUI shows it in its preview, then ask again. You can also name the frame in your message. - “No frame with that nodeId or name. Call list_frames again.” (
NODE_NOT_FOUND) The frame was renamed, moved or deleted after the AI listed your frames, or no frame on your current page has the name the AI asked for. Check the name, open the page that holds the frame in Figma and ask the AI to list the frames again. - “More than one frame has that name. Call list_frames and pass nodeId.” (
AMBIGUOUS_FRAME) Two or more frames on your current page share that name. Select the one you mean in Figma and ask the AI to send what you selected, or give one of the frames a different name. - “Send a frame, group or component from list_frames. For a layer inside a frame, select it in Figma and call send_to_studio without nodeId.” (
NODE_NOT_SENDABLE) The AI named a layer that cannot be sent on its own. Ask it for a frame, group or component from the list, or select the layer in Figma and ask it to send what you selected.
While a Send runs
- “FigBloxUI is busy with another Send or preview. Try again when it finishes.” (
BUSY) Wait for the current Send, or the open Allow / Deny prompt, to finish, then ask again. FigBloxUI runs one at a time. - “The Send was declined in Figma.” (
DENIED) Someone clicked Deny, so nothing was sent. Ask again when you want it and click Allow. - “Nobody approved the Send in Figma within 60 seconds.” (
APPROVAL_TIMEOUT) The Allow / Deny prompt went unanswered. Keep Figma in view, ask again and answer within 60 seconds. - “The Send failed. The log shows what FigBloxUI reported.” (
SEND_FAILED) Open the activity log in FigBloxUI to read what it reported, and look for that message in Troubleshooting. If it saysthe selection changed, Send cancelled, your selection changed between your request and your Allow, so ask again and leave the selection alone until the Send starts. To share the log, hover over it and click Copy log, then see Feedback. - “That sendId is unknown or expired.” (
UNKNOWN_SEND) FigBloxUI remembers a Send for up to a day. Ask the AI to send again, or read the activity log to see what happened.
Limits and our side
- “Too many requests. Wait a few minutes and try again.” (
RATE_LIMITED) FigBloxUI limits how many requests an AI can make in an hour, and allows up to 30 Sends an hour. Wait a few minutes, then ask for one Send at a time. - “One of the arguments is not valid” (
INVALID_ARGUMENT) The message goes on to name the argument. The AI asked in a way FigBloxUI could not read, so ask it to try again, and to list your frames first. - “Something went wrong on our side.” (
INTERNAL_ERROR) The message ends with a short reference code. Try again in a minute. If it keeps happening, send us the code through Feedback.